Pick a recording device and try it out, but don’t try to solve everything at once. Start with the video and make sure that your device works in your environment. Your cellphone, iPad, GoPro, DSLR or other device might be perfect, but each has its own benefits and limitations, and each may require different audio solutions. For instance, your cellphone can record continuously for hours and doesn’t take up a lot of storage compared to say, the GoPro, but does not likely have great depth-of- field. A DSLR has great depth-of-field capabilities but might not be able to record continuously for more than five minutes. An iPhone 8 requires Lighting to USB or 3.5 mm adapter for external audio, while a Galaxy S8 does not require an adapter for use with an audio device that uses a 3.5 mm connector. Try some test shots using each of the devices that you are considering and pick the best one for your recording environment. Just concern yourself with composing the picture, we will deal with lighting, audio and others in another lesson: the addition of video lights may mean that you can use different cameras to achieve the same effects. In order to give the appearance of controlling depth-of-field, portions of the final video can be blurred out in post production.
The steps
1) Create short demos using each of your video recording devices — make sure that you record in landscape mode. If the recording device has multiple cameras, the rear camera will typically provide better resolution. Remember, we are looking at composition, file sizes, brightness, and others that affect the overall image quality.
2) Compare the picture quality, file sizes, ease of use, etc. and select the best one(s) for your purposes.
3) Find a stand and holder (see example below) for your device — make sure that your stand lets you level the camera. While you might be able to use components that you already have, for example a selfie stick or video tripod, you might have to purchase appropriate components to hold the camera. Make sure that you can return anything that doesn’t work out for you.
4) If possible, mirror your cellphone or other recording device to a television or other monitoring device so that you can see what you are recording — if you keep the device in your line of sight, you won’t appear distracted while you are making sure that everything is properly in the frame.
5) Record a full-length video and ensure that you are satisfied with the setup, operation and composition. Audio and lighting will be discussed in subsequent lessons.
My test setup
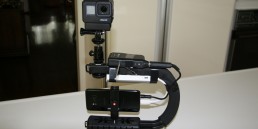
For my testing, I used a tripod and mounted devices directly to the tripod or used special mounts, such as the Manfrotto Pixi Cellphone Adapter, to mount my devices. I currently use a much more complex camera rig, but for simplicity (all of these components are used in my current camera rig). I mirrored the output to a Google Nest Hub.

Some things to look for
1) Can you see your entire subject in the video, for example, heads are not cut off?
2) Do objects or people that you don’t want to show appear in the video, for example, an address or child?
3) Are light sources interfering with the image, for example light from a television or sunlight?
4) Does the camera height appear pleasing?
When you are satisfied with the overall composition, proceed to the next lesson.
Sample setup
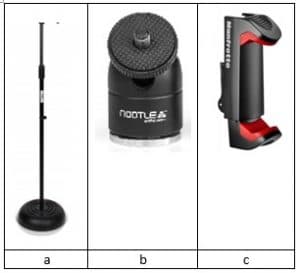
In order to reduce costs and use a smaller footprint, you can mount your video recording device on a microphone stand (selfie-stick tripod or some other inexpensive device that you can put on a box, chair or counter). If you are not recording with a cellphone, you will have to replace the cellphone clamp with an appropriate adapter.
 a) Microphone stand such as the PMKS5 from Pyle. This unit adjusts from 34 to 60 inches and costs $20.
b) 5/8” to ¼” adapter with ball head such as the one from Nootle, so that you can mount gear using camera standards. Costs $15.
c) Cellphone clamp such as the Manfrotto Pixi for $20 (screws into the ¼” bolt above). Note, this device has a cold shoe that can be used to attach a light or other device.

