Now that the video composition is good, it is time to consider the audio. Listen to the audio that was created when you recorded the video. If the sound quality is acceptable, just use the recording from the video recorder as is. Otherwise, continue with this lesson.
There are numerous alternatives for improving the audio portion of your content. Devices such as a cellphone or GoPro have built-in microphones which can be used to record audio, but in many cases, the distance between the subject and the device is too far to produce good sound quality, there are excessive background noises or there is an echo. Other devices, such as a DSLR camera, do not have onboard microphones. If you are recoding in a gym or cycling studio that already has a wireless microphone and mixing board, your best choice is to use an audio recorder that has separate inputs for voice and music, otherwise, your best option is to use a wireless transmitter/receiver combination. Remember, if you have music playing in the background of your videos, your content will be subject to royalty payments.
Using a wireless receiver connected to the video recording device or audio recorder
1) Pickup one of the following:
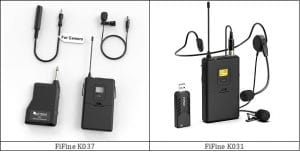
a) a wireless microphone system with connectors that are appropriate for your video recording device, for example, a FiFine system with transmitter, receiver and lavalier microphone and either USB (K031) or 3.5 mm (K037) connector for around $50. I use the FiFine K031 with a 3.5 mm connector: you might have to get a TRRS to TRS cable depending on your video recording device requirements. You can also use more expensive units such as the Rode Wireless Go for $200 or the Sennheiser AVX-ME2 for $700.
b) a lavalier microphone to attach to directly to an audio recorder, typically around $100.
2) Connect the lavalier microphone and transmitter box or recorder to the presenter.
3) Connect the receiver, if you are using one, to the video recorder.
4) Record a test session and review the output. If you use an audio recorder, you will have to merge the audio file with the video file in post production before you can check the quality.
5) Once the audio is satisfactory, record a full video and ensure that it works for you.
Using an audio recorder connected to a mixing board
1) Pickup an audio recorder such as the TASCAM DR-60 Mark II ($200) and an SD-card to store the audio files. Ensure that the device can record up to 4 channels and can be powered using a standard USB cable.
2) Connect the recorder to the mixing board and optionally to the video recorder.
3) Record a test session. Depending on your connections, you will have to merge the audio and video in post production before you can check the quality.
4) Once the audio is satisfactory, record a full video and ensure that it works for you.
My setup (3.5 mm connector)
I attach a FiFine K037 receiver to my Galaxy S8 cellphone using the 3.5 mm connector and wire my subject with a lavalier microphone and transmitter pack (all included for less than $30). The receiver uses 2 AAA batteries while the transmitter uses 2 AA. FiFine also makes another a version with a USB receiver (K031). I find that the 3.5 mm version works best if the video device has a 3.5 mm connector, for example the Galaxy S8, while the USB version works best if the devise does not have a 3.5 mm connector, for example, the iPhone 10.


